


It has become a common norm nowadays to have a Chatbot-assisted user experience while surfing a website. Chatbots make it easier to get information where we do not require a lot of details. And as a web developer creating something like an e-commerce website, it's a good idea to embed a chatbot in it. Now as simple as it sounds, making a chatbot from scratch can be extremely tricky. That's where RASA comes in.
What is RASA?
Rasa is an open-source framework for building conversational AI applications, like chatbots and virtual assistants. It allows you to understand and respond to user queries naturally and engagingly, even across different communication channels like text and voice.
It provides us with a ML model which we have to train with our dataset, to make it work as we want it to.
to set it up in your local machine, refer to this. (note: follow the instructions for Rasa Open Source. Ignore the Rasa Pro part.)
Creating Dataset
Now in your current folder(where you initiated Rasa), there is a YAML file named "domain.yml" and inside the "data" directory, there are two YAML files named "nlu.yml" and "stories.yml". These are the files where we have to work. Before starting, let's first discuss what each file does.
nlu.yml
NLU stands for Natural Language Understanding. Here, we have to provide sample examples for a particular intent, which is the different variants of questions the user can ask. The model will train on these examples and then will predict what is the intent of the user. By recognizing the intent, the model can give the appropriate response, which we have provided in the domain.yml file. In the below code, the model will generalize all the queries from users with similar sentences as "greet".
nlu:
- intent: greet
  examples: |
    - hey
    - hello
    - hi
    - hello there
    - good morning
    - good evening
domain.yml
In this file, we will create all the responses that we want our chatbot to respond to. Also, we will list down all the intents that we created in our "nlu.yml" file. Right now, we have one intent named "greet", so this is how the file will look like.
intents:
  - greet

responses:
  utter_greet:
  - text: "Hey! How are you?"
stories.yml
Here, we have to create the conversation flow or simulate the way the conversation between the user and chatbot will go on. Here is a sample story for our "stories.yml" file.
stories:

- story: happy path
  steps:
  - intent: greet
  - action: utter_greet
Here, in our "happy path" story when "greet" intent is predicted by the model, it responds with the "utter_greet" action. You can add various other intent-action(s) pairs in one story or create multiple stories for different conversation flows.
Training and Running our model
Now that we have our dataset, it's time to test if it's working or not. First, we have to train the model. To do that, open the terminal in the project directory and run the following command.
rasa train
Rasa will automatically train the model according to the data fed by us.
Now, to run this model in the shell, run the following command.
rasa shell
This is what the conversation looks like
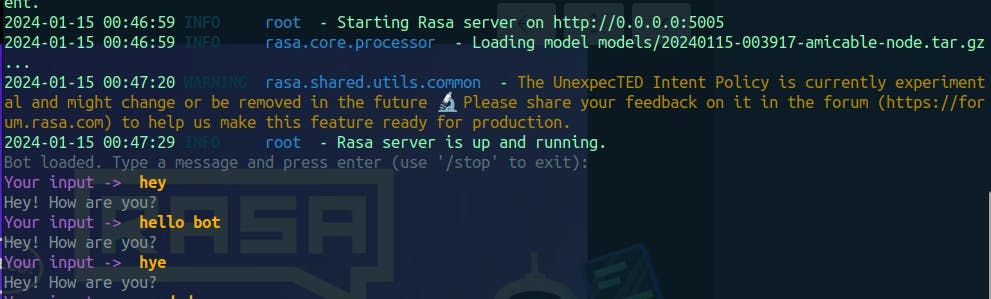
So, this was a small demonstration of how you can make your own Chatbot from Rasa in a very short time. Of course, right now it can handle only one intent, but it is fairly easy to create multiple intents and for them, multiple responses. You have to do some research to make appropriate responses and examples for intent. If you want to embed it in your web browser, you can follow this and this.
Fun Fact: it took me more time to write this blog than to make the chatbot.